How to Draw Nike Shoes Step by Step Easy
Howzoo is reader-supported. If you buy through links on our site, we may earn a commission. Learn more
I like to get my money's worth out of the things I buy. This means:
- I squeeze the last bit of toothpaste out of the tube.
- I put water in the shampoo bottle to get that last little bit of shampoo.
- I put 150,000 + miles on my automobiles.
- And yes, I wear my shoes until the soles fall off.
Just kidding on that last one but I do like to get decent life out of my shoes.
I have a pair of running shoes that were still in decent shape except for the fact that the soles were separating from the uppers. I didn't want to throw them away because I felt like I hadn't gotten my money's worth yet.
So I decided to glue the soles.
Shoe Sole Repair Steps
1. Clean the Repair Area
The first thing we need to do is to clean the area that is being glued. I used some isopropyl rubbing alcohol on a cloth. Let the area dry for a few minutes after cleaning.
2. Preparation
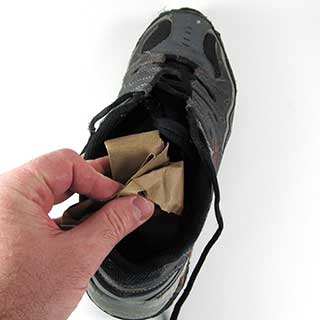
Remove the insoles if you can and stuff some paper in the shoes. This gives the shoes some rigidity which is needed during the clamping process. It will also absorb any glue that may seep inside the shoes.
I used some heavy kraft paper but you can use newspaper as well. The toe area should be firm after stuffing with the paper.
3. The Glue
We will be using Shoe Goo to glue the shoes back together. Shoe Goo is a very thick and sticky glue. You will want to wear disposable gloves to keep it off your skin. Put some sort of paper or plastic sheet on your work table to catch any drips.
Before opening the glue, read the instructions and the product warning label.
To open the glue, pierce the tube with the cap. I put some petroleum jelly around the threads of the tube to prevent the cap from getting stuck later.
4. Apply the Glue to the Sole
Use a toothpick to apply the Shoe Goo into small areas. For larger areas, you can just squeeze the glue directly where it needs to go. Then you can spread it around with a cotton swab.
Don't get the glue on the toe cap area (like I did in the photo.) We will glue the toe cap in the next step.
The manufacturer's instructions recommend acetone or citrus-based solvent to clean up the adhesive. I was afraid that acetone would melt the soles, so I used a citrus-based solvent for cleaning.
I had a few different types of citrus degreaser. I found that my B'laster Citrus Based Degreaser worked the best.
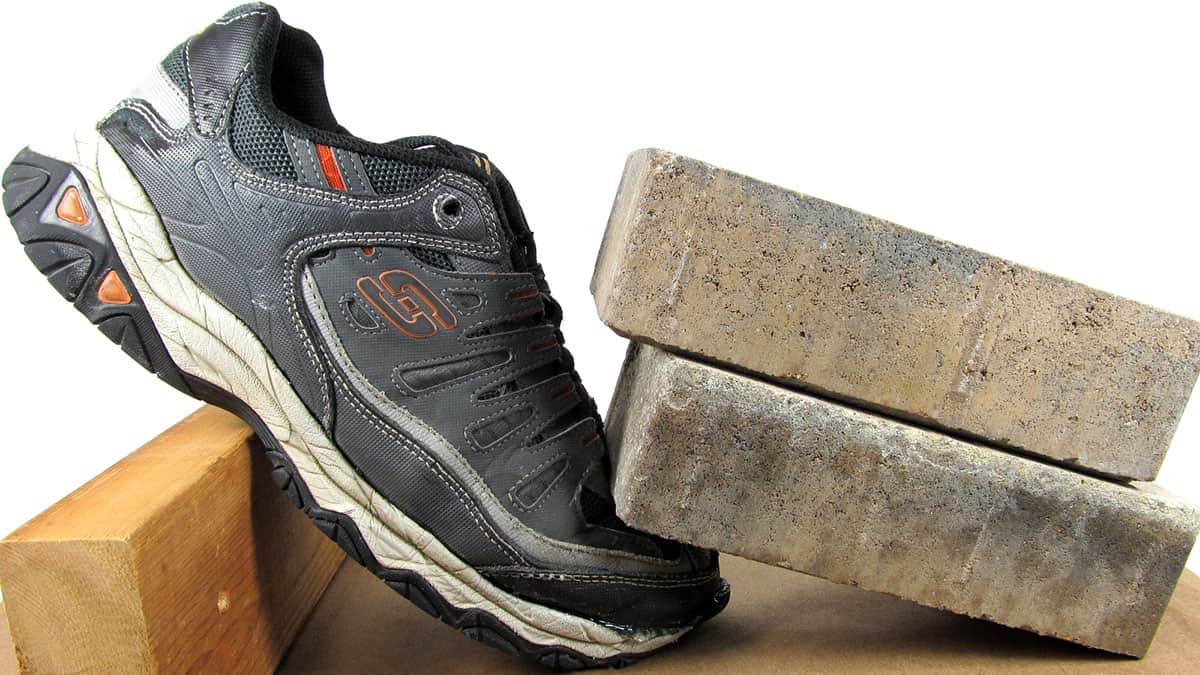
5. Clamping the Shoe
Let the glue cure for about 2 minutes before mating the surfaces.
After 2 minutes you can places some weights on the shoes to hold the sole and the upper together. I used brick pavers as my weights. Put the heel of the sneaker on a block of wood as shown.
This process will need to be done in two steps. We will glue to sole first and then do the toe cap area last.
Let the glue dry for 24 hours.
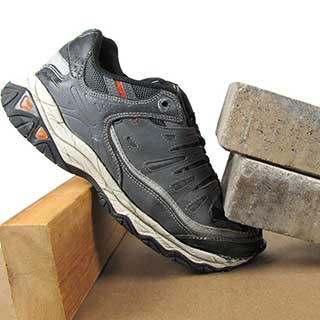
6. Glue the Toe Cap
After the sole has dried for 24 hours, we will glue the toe cap.
Glue the toe cap to the front of the sneaker and clamp as shown in the accompanying photo.
I used two 18 inch bar clamps, two blocks of wood, and two paver bricks. You may be able to figure out another way to do this but this worked for me.
If I do this again, I will put some wax paper between the toe cap and the wood block to prevent the glue from sticking to the wood block.

7. Trimming the Squeeze-Out
After 24 hours, remove the shoes from the clamping contraption.
I didn't use any wax paper and the shoes got stuck slightly to the wood block. I used a Scotty Peeler to separate the shoe from the wood.
You will most likely have some glue squeeze-out that needs to be trimmed off. The best tool for removing this is a pair of Xuron Micro-Shears. I have been using Xuron cutters for many years and I feel that every workshop should have a pair of the Micro-Shears and also the Maxi-Shears.
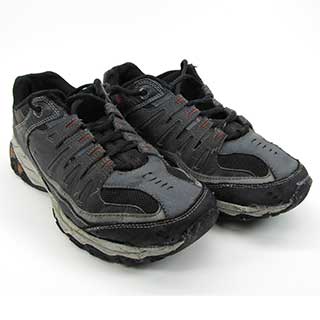
8. Sneaker Repair is Complete!
Remove the paper from the shoes.
These running shoes had a glued-in memory-foam insole which got a little out-of-shape from the paper shoved in the shoe. The next day they were fine.
Conclusion
Now you can get a little extra life out of those expensive running shoes!
I hope you found this article helpful.
Please share using the social media buttons below.
Jeffery Holmes is the founder of Howzoo.com and has been a home & garden blogger since 2013.
Twitter: @DIYJeff
As an Amazon Associate I earn from qualifying purchases.
Reader Interactions
How to Draw Nike Shoes Step by Step Easy
Source: https://howzoo.com/how-to-repair-shoe-soles/
0 Response to "How to Draw Nike Shoes Step by Step Easy"
Post a Comment